
Camila bled for her lovely lamp! Way to go!
Mel and I were approached by our friends Camila and Matt to repair their busted up Continental Art Company lamp. Ok, here is the story with this lamp…Camila saw a lamp just like this one but with different colors. She could not get that lamp out of her head so Camila made the ultimate sign of love……she got a tattoo of it on her forearm. A couple weeks later good fortune smiled upon Camila when she saw it online for sale for next to nothing. It had been broken in half, glued back together, and had lots of chalkware busted out and missing. I felt really good knowing Camila trusted me enough to fix her fantastic lamp. This lamp is so cool it will be hard to give it back. Mel and I debated on going into hiding to keep it…We could send pictures of it to them along its adventures (kind of like that gnome guy). But, anybody who loved this lamp enough to get a tattoo of it would track me down, steal my life, and take the lamp back. Thus, leaving Mel a widow.
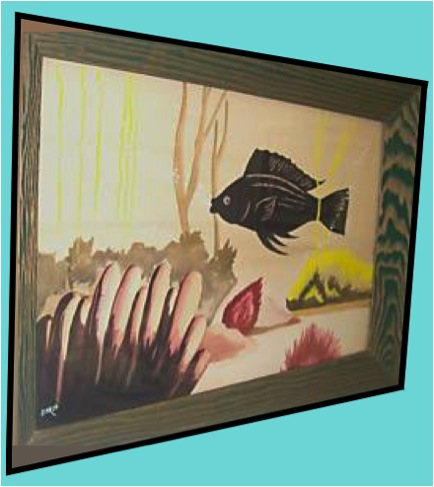
Anyways, here is what we were dealing with when I got the lamp…

Here is the front with areas marked that need attention.

As you can see the back of the lamp appears to have taken a lot of damage.

The first thing to do was to fill all the cracks and areas that had missing material with spackle.

Here is the damage around the switch filled in.

After the DAP spackling dried I sanded it down and painted it.

After all the damage was filled and sanded I started to repaint the whole lamp. I used a semi gloss Valspar house paint. Mel and I shot over to Lowes to match the colors so we could make this lamp look like we didn’t change anything.

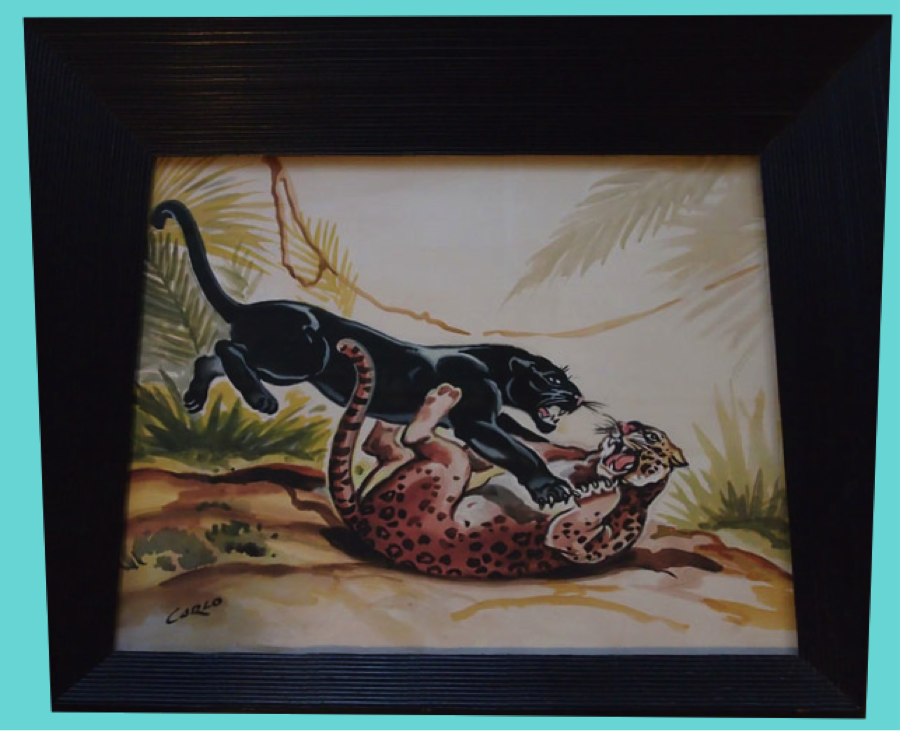
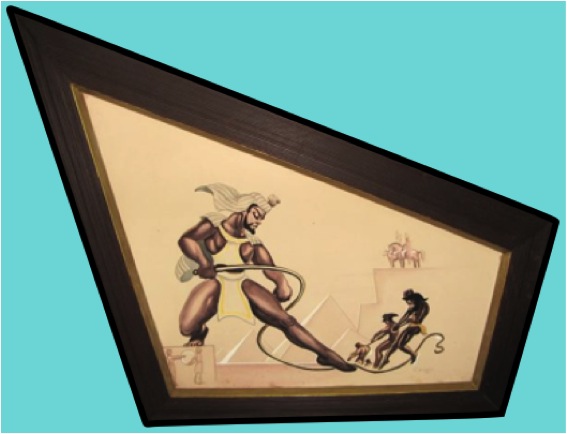
As you can see even with a complete repaint (yes, the entire lamp was repainted, everything) this lamp looks just like new and original. Mel even helped with some of the detail work!

As you can see the back of this lamp looks perfect and who could tell this lamp had previous damage?

Mel and I love the way the lamp turned out. I hope Camila and Matt love it too!

Here’s the final piece!


You are stinking AMAZING! There, I said it again. Oh I KNEW you were up to something BIG since you haven’t been here for a while & I’ve been dying to know what it was! You’ve struck me speechless again Hepcat. Just WOW.
~Vic~
LikeLike
Hey Vic,
Thanks for your compliment. Yeah, I’ve been working on this since Saturday. There was a lot of detail work and steps to repair it. I hope to get started on the Heywood Wakefield vanity next….unless something else catches my eye :).
BTW..we’ll call you about hooking up on Saturday to pick up the desk. I can’t wait to get started on that resto. She’s gonna be a beauty when I’m done.
LikeLike
Oh, I am crazy-wild excited about that project! I just knew as soon as I saw your first resto’s that you should be the one to bring it back to gorgeous. You know I was going to finally attempt to tackle it this summer because I couldn’t bare to send it to the bone yard, but I know what you’ll be doing spin circles around anything I might have tried. You can’t know how happy I am about this.
~Vic~
LikeLike
We’re excited too. I’m also anxious to see what Bill from B&T will do with the upholstery on the chair.
LikeLike
Looks AMAZING!! thanks so much you two! I can’t wait to see it in person. I’m in love all over again.
LikeLike
Thanks Camila!! We’re so glad you love it. Thanks for for trusting us for the restoration. We’ll see you this coming weekend.
LikeLike
Your restores give me so much hope for one of my old lamps that i need to repair. How did you get the gold speckled look on the black paint?? Thanks in advance!!!!
LikeLike
Keith,
I’m glad that my restores are providing some inspiration out there!! For the speckle, you need to use a new toothbrush that has either hard or medium bristles. Dip the toothbrush in your paint of choice and blot off excess paint. You don’t want a lot of paint on the brush. Make sure you are about 7 or so inches away from your piece. Then, run your thumb quickly, back and forth on the brush to flick paint on your piece. Practice first on some cardboard or something like that to make sure the speckle is the right size and shape you are looking for.
I hope this helps. Good luck!
Hepcat
LikeLike
heheheheee…..Camila saw and feel in love with my lamp “Mr Sparkles”… Camila and I were facebook friends from way back. If I ever decide to get rid of Mr Sparkles, I know who I’ll be sending him to!
http://welcometodeluxeville.blogspot.com/2011/04/vintage-top-five.html……
Nice work on the lamp!
~MaryDeluxe
LikeLike
Thanks! Yeah her and Matt are great. We have only known them for a short while. You ever want to sell “Mr.Sparkles” then you have two parents willing to adopt.
LikeLike